
While VROC® instruments are designed to work simply and seamlessly, when running viscosity measurements there are few steps to follow to ensure your measurements are accurate.
1. Clean Your Work Bench
Having a clear and prepped work area is the first crucial step to optimizing the accuracy of your viscosity measurements. When clearing your work bench compress air is your friend! Use compressed air, canned or from a stationary compressor, to blow off your bench. This will remove lint, fibers, and dust that can contaminate your pipette or syringe when running your viscosity measurements.
2. Place Lint Free Paper on Bench as Barrier
Once you have cleared your bench of fiber, lint, and dust with compressed air, place lint free paper on your bench or work area, which will act as a barrier between the bench surface and your samples. NEVER put Kim Wipes or paper towel under your lint free wipes. Both Kim Wipes and paper towels house millions of fibers that can contaminate your pipette or syringe.
* We recommend using TX604 TechniCloth, which you can purchases here!
3. Prepare Your Sample
Once your work bench is prepped, it is important to prepare your sample for testing. When testing with VROC® technology we recommend following what we call the "10% Rule". Each of our flow channels has a specified depth, and we recommend when you run samples through that channel your sample particle size is less than 10% of the channel depth. For example, for an A05 chip the channel depth is 50µm, meaning that 5µm would be the maximum size for hard sphere particles in a sample run on the A05 chip. Before running your sample, confirm the particle size of your sample is within the 10% rule for the VROC® chip you are using for your measurements. It is also important to check that your samples are well mixed. If your sample is not homogenous your data will not be reliable and you will have poor Rsq values and poor repeatability. 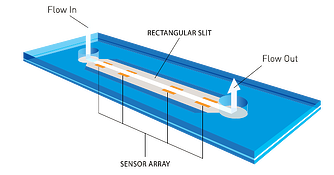 Rsq is the slope of the pressure drop from the leading sensor to the last sensor in the VROC® rectangular slit microfluidic cell. There are (typically) 4 pressure sensors in each cell, and the pressure drop along the sensor array should be linear (slope = 1.000). When measuring samples, RheoSense requires a minimum Rsq of 0.997. An Rsq of 0.997 and above is confirmation that flow is laminar - all viscosity calculations, no matter what technology is used to measure and calculate, must be conducted under laminar conditions. An Rsq value below that indicates some sort of turbulence caused by something in the flow channel, such as fibers, residue or that the sample is not homogenous. A low Rsq value will result in poor repeatability which makes this an important parameter to monitor.
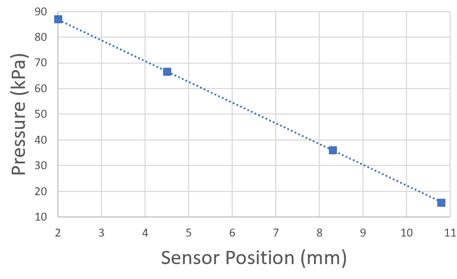 Learn more about selecting the right chip for your samples here!

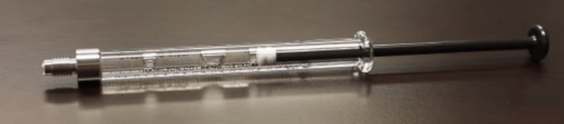
4. Prepare and Assemble Pipettes and Syringes
When loading samples into your VROC viscometer, you will use either a syringe or a pipette. Syringes are used when utilizing the m-VROC small sample viscometer and pipettes are used when using the microVISC portable viscometer. Before assembling your pipettes and syringes, you should blow them off with compressed air (canned or from a stationary compressor) to remove any fibers, lint, and dust from the pipettes and syringes themselves. It is important to assemble your pipettes and syringes on the lint free paper you placed on your bench as a barrier. The only items that should come in contact with your pipette or syringes are lint free paper, your sample, cleaning solvents, and your VROC chip sensor. Please note that the m-VROC syringe has a separate needle assembly used to aspirate samples and compressed air should be used on this as well before connecting it to the syringe. It is not advisable to place the syringe tip directly into your sample. No needle attachment is needed for your pipette, as it can be used directly. 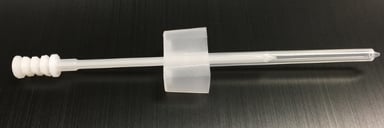 *Pipettes and syringes can both be purchased here!
5. Loading Your Sample
Once you have confirmed your sample meets the 10% rule criteria and is properly mixed, it is time to load your sample into your syringe or pipette. Once the sample is loaded into the syringe or pipette, you will need to remove any large air bubbles. Tiny air bubbles at the plunger tip are not an issue, however, larger air bubble within the sample may cause poor Rsq values and decreased repeatability. Once the sample has been loaded into the syringe or pipette and air bubbles removed, blow off tip with compressed air before connecting to the viscometer. This step will help to decrease possible dust in the air that may have settled on the syringe or pipette tip from being introduced into the VROC chip microfluidic channel, providing one final check that no fibers, lint or dust are present to contaminate your sample measurements.
 Watch here for a full tutorial "How To Remove Air Bubbles From Syringe
6. Set Your Measurement Parameters
Once you have loaded your sample into the VROC viscometer is it time to set your measurement parameters.
m-VROC
Common, or necessary, measurement parameters for the m-VROC begins with an estimation of viscosity. To run a measurement on the m-VROC shear or flow rates are input manually. Therefore, when measuring for the first time a sample of unknown viscosity, it is necessary to perform a baseline measurement. In the measurement parameter entry section enter an approximate viscosity to generate minimum and maximum shear or flow rates range. This doesn't have to be exactly accurate, but does need to be a close estimate as this will guide the end user on what rates to input in the rate section. It is advisable that the first or baseline measurement not be run at the max rate but rather at around 40% of the maximum. Once a baseline viscosity value is calculated, input this viscosity value back into the measurement parameter entry section. This will now generate more accurate minimum and maximum rates to operate within. It is also important to pay attention to the % Full Scale as this must be between 5-95% for accurate and repeatable data. If the % Full Scale on the baseline or any measurement for that matter falls below 5%, repeat the measurement at higher shear or flow rates. If the % Full Scale is above 95% decrease rate to prevent damage to the chip.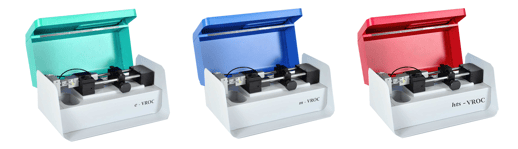 Pro tip: It is advisable to pick a shear rate value at around 40% of the max shear rate, to ensure the chip is not damaged
microVISC
With the microVISC portable viscometer, you are able to run samples in "automode", which will prompt the viscometer software to try and reach 50% Full Scale. Once samples are run in "automode", the microVISC end user can now go into ADV Mode to set shear rate higher or lower based on viscosity reading from automode.
 See how easy it is to run samples on the microVISC portable viscometer here!
Written by: Rick Paulino, RheoSense Regional Sales Manager & Eden Reid, RheoSense Senior Marketing and Sales Operations
COMMENTS